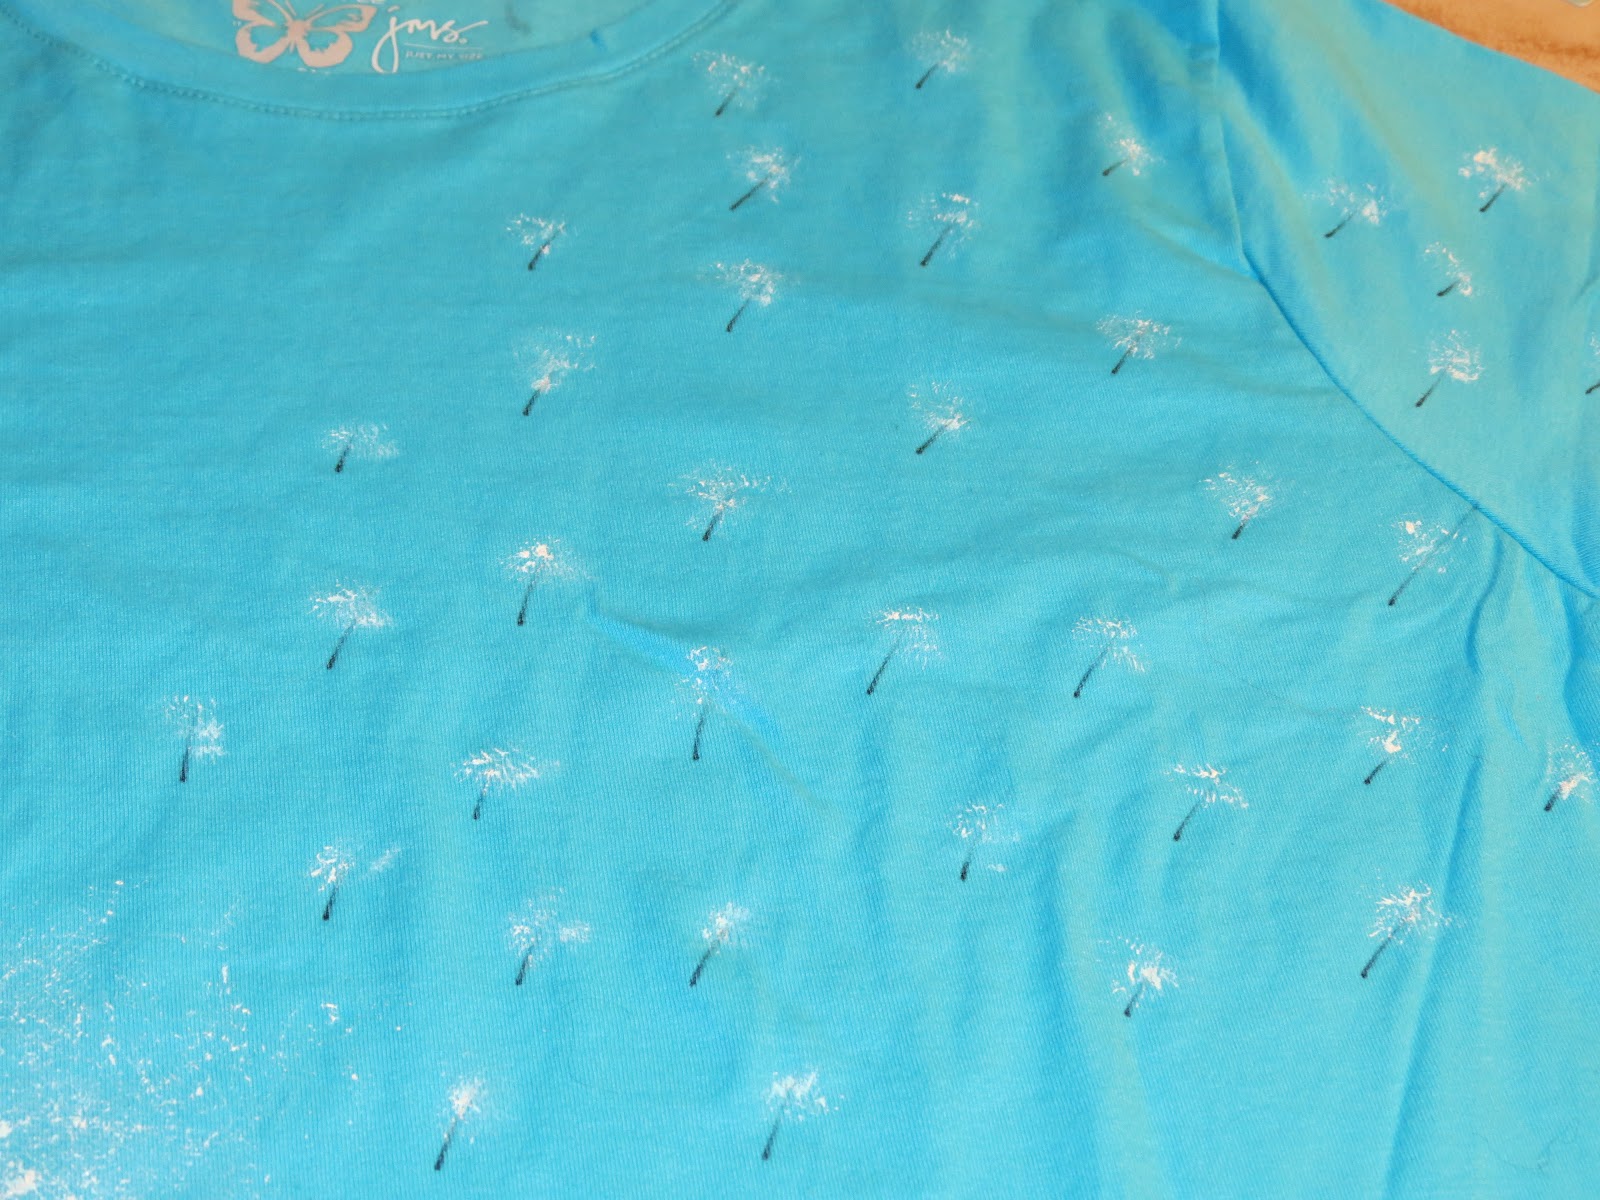
I originally saw the Dandelion shirts on Pinterest. Following the directions, I made one for my eldest and my niece. The shirts turned out really cute but everyone though the fly-aways looked like butterflies of dragon flies, so I revamped my methods. Here's how I made my following shirts step-by-step.
Step One: Paint the stem. I've been using Tulip Soft fabric paint.
Step Two: Draw the "Fly-away" seeds. I used a fabric pen by Zig and used an upwards flicking motion . You need to iron over the ink to set. It is best to iron before painting further (I did forget to do this, while the shirt wasn't damaged, the Tulip paint did stick to the iron) You can interchange the first two steps but I found drawing the stem helped with placement.
Step Three: Paint the flower head. I spread a mix of white and silver glitter fabric paints into a thin layer to dip the bath puff in. I made multiple pounces until I got the flower head as big and as dark as I wanted. I found spreading the paint allowed me to pick up a little layer of paint that I layered until I was happy with it.
Step Four: Painting the fly-aways. I cut a small piece of netting off my bath puff and scrunched it up to paint he fly-aways. A couple of dabs on scratch foil was needed to get the right balance of netting. Like the flower head a couple of layered passes were needed in some spots. I left some fly-aways lighter and some darker and defined to give depth, though the picture is hard to tell.
Optional Step Five: Add Iron on gems to flower head and/or seeds. I don't have a picture of this but did add gems to another shirt. I used and Imaginisce I-rock tool.
The Most Important Final Step:Wear and Enjoy
Thursday, April 26, 2012
Monday, April 23, 2012
Wow, it has been a while. Ifinally have a finnished addition to my house which means... CRAFT ROOM. My own space. Only problem is organizing all my stuff, YIKES!!! I have picked up a few new crafts along the way too. I finally picked up needle knitting, YouTube is my best friend. I love it, everyone got new scarves for Christmas. Then, right before Christmas, I picked up spinning. Yes, I am now spinning my own yarn though I still go nuts in Joann's yarn section. I am still making cards though alot of that stuff is still being brough out and put into it's own place in MY ROOM. I have also made a few shirts with my girls. I tried Sharpie Tie-dye. The girls loved that. I also tried Dandelion t-shirts I saw on Pinterest. This is the original link. Here is my first attempt.
Cute, isn't it. My only issue was everyone I showed it too thought the little fly-aways (we always called them Santa Clauses when we were little) were butterflys. So for my second try I changed them alittle. I like this a little bit better.
Close up pic.
Cute, isn't it. My only issue was everyone I showed it too thought the little fly-aways (we always called them Santa Clauses when we were little) were butterflys. So for my second try I changed them alittle. I like this a little bit better.
Close up pic.
Monday, October 10, 2011
I has been a while but I have swapped my "craft of the moment". A girlfriend of mine introduced me to Knifty Knitters. I have always wanted to knit but alas, as many times I have tried to learn I cannot get the hang of it. Well, I never thought to try loom knitting which is all Knifty knitters are. So I got hooked, no pun intended. My kids are fascinated, the youngest two cannot wait for which hat I will make them next and the oldest has caught on and has even made herself a scarf (at 8 and she has ADHD this is an amazing accomplishment). Check out the products of my new addiction.
This is a scarf I made using 2 strands of very fine variegated yarn. I can never start simple and this scarf is made with a honeycomb stitch I saw on youtube.
As I said my eldest made herself a scarf and this is it. She did a great job. I just did the start and finished it off but she did the rest.
As I said my eldest made herself a scarf and this is it. She did a great job. I just did the start and finished it off but she did the rest. Now I am off to do more.
Wednesday, August 24, 2011
Today I finished up a baby gift for one of my co-workers. It's a girl and she (my co-worker) decided on pink zebra for her baby's room. I had not originally planned on making her gift, just the card, but when I saw this quilt kit I couldn't pass it up.
Beautiful pink and brown fleece patterns including zebra, pink satin and super soft brown plush fabrics just perfect for a baby girl.
I also made her card. My standard 6x6 with a white base. A medium pink embossed with Cuttlebug swiss dots. I lighter pink shimmer paper with 2 embossed lines along the edges. The baby is a digi stamp from Digi Doodle Shop (check them out), printed on X-Press It paper and colored with copics. The leaves are a Sizix die and the roses are made from Spellbinders Rose Creations and Retro flower punches. I have yet to figure out how to make fitting buds so these were bought along with the white mini flowers. The stick pins were hand made alone with the pearl sprays. I got to play around with a new product for me, Tattered Angels Glimmer Glaze in Plumeria. I glazed the dark pink flower along with painting the rattle on the tag. So far I am really liking Glimmer Glazes. I also tried it out on some stamps both digi printed out with my ink jet printer and regular stamped with Memento inks. So far no ink bleeding. They don't seem to be water-based like the sprays and have a little odor that I am having a hard time placing at the moment. Enough for now. Later!
Tuesday, July 26, 2011
Beach Wedding
My BIL got married on the beach last week and I made this card for him and his new bride.
I used Magnolia's Loving Bridal Couple and a beach background colored in copics. I thought the cream color scheme was more "beachy" even though this is her first marriage (his second). I had some shimmery paper on hand in green, pink and yellow and used them to make the flowers and leaves. I used some mini shells, starfish and sand dollars to accent the card. The sentiment is from Fiskars. I also made an envelope box to match.
Sunday, July 10, 2011
It's been a very busy month for me, the drywall is up in my addition and most of my free time is spent working on that. Spackle, sand, spackle, sand, paint, touch-up, clean up little hand prints when the little ones get into something. I don't have alot of time to finish cards but I'm gonna post the ones I haven't already.
This was the Father's Day card I made for my dad. The image is from Mo's Digital Pencil Shop. Every one thought this image looks like my younger daughter. I colored it just like her with her mix of girl and boy's clothes (she swipes the boy's clothes from her cousin's hand-me-downs set aside for her brother).
This one is the Father's Day card I made for the kids to give to my hubby. The image is Lili of the Valley.
This was one I made for no particular reason. Yellow was never really a favorite color to use so I was extending my color pallet. The large rose is hand made using my Rose Creations die set.
This was the Father's Day card I made for my dad. The image is from Mo's Digital Pencil Shop. Every one thought this image looks like my younger daughter. I colored it just like her with her mix of girl and boy's clothes (she swipes the boy's clothes from her cousin's hand-me-downs set aside for her brother).
This one is the Father's Day card I made for the kids to give to my hubby. The image is Lili of the Valley.
This was one I made for no particular reason. Yellow was never really a favorite color to use so I was extending my color pallet. The large rose is hand made using my Rose Creations die set.
This is the last. Not much special about it, just playing around really.
Hope you enjoy some of my work.
Wednesday, June 8, 2011
I made this card really just by playing around. I had no real plan, just the background paper which is called Smitten 12x12 Pretties that I bought at Michaels. I colored Tilda to match using E37.E33, E31 for her hair and R22,R21, R20 and R00 plus E29,E27,E25 for her clothes. I cut the the corner and border from Spellbinders Floral Doily Accents out of Brown cardstock, embossed them and used Perfect Pearls over the embossed parts. The larger flowers were made from Spellbinders Rose Creations and the smaller were out of a small retro flower punch. The leaf spray is a Sizzix die and MS Pine branch are added touches behind the flowers. I regret to say I have not figured out how to make my own rose buds so those are purchased. Swavorski crystals accent the photo corner and the lower right.
Monday, June 6, 2011
I have a new card to share today. I made this as an End-of-the-Year Thank You for my daughter's teacher. I also made an envelope box to match. It is a center step card using Split Coast Stamper's tutorial of the week.
I used Magnolia's Mermaid colored with Copics and embellished with Stickles. The shell wave behind her is a Jolee's sticker. I use some generic skittles as bubbles on the center panel and the side panels are embossed and sanded using Sizzix summer embossing set. The "Ocean Floor" is tan card stock with super sticky tape over top and real sand pressed on. I made the pearl stick pins and the beaded sprays. The flowers and "sea weed" are both organza ribbon that I melted with my heat gun.
I made the box using the tutorial from Pop'sPlace Blog, If you have a chance, check out her blog, she is incredibly talented. I stamped the lid before gluing the corners with some shell stamps and put some white tulle around the card.
I used Magnolia's Mermaid colored with Copics and embellished with Stickles. The shell wave behind her is a Jolee's sticker. I use some generic skittles as bubbles on the center panel and the side panels are embossed and sanded using Sizzix summer embossing set. The "Ocean Floor" is tan card stock with super sticky tape over top and real sand pressed on. I made the pearl stick pins and the beaded sprays. The flowers and "sea weed" are both organza ribbon that I melted with my heat gun.
I made the box using the tutorial from Pop'sPlace Blog, If you have a chance, check out her blog, she is incredibly talented. I stamped the lid before gluing the corners with some shell stamps and put some white tulle around the card.
Monday, May 9, 2011
I've been feeling Patriotic lately and started some red,white and blue cards. This one was sweet and simple. I had picked up the paper a long time ago but the red had a metallic sheen and the white I used for the stars was glitter. The rest was plain old cardstock. I cut the stars out with my Cricut and the lacy border was a MS punch. You can't really tell but I used stickles on Tilda's shoes and flowers. 
This one I am really proud of. Again I used my Cricut for the stars out of the white glitter paper as well as the white circle. The red circle is a holographic paper from Targets $1 scrapbook supplies. I made all the flowers except for the tiny buds.
Here's a better look of Tilda and the Flowers. I used one of my favorite hair combos, Copic E97, E99 and Y21. I really love the golden blond. The red and blue flowers were made from small and medium retro flower punches and the white flower was Spellbinders Rose Creations. All flowers were spritzed with glimmer mists and the centers of the blue flowers was Distressed Stickles in Walnut Stain.
Hope you enjoy!
Monday, May 2, 2011
I'm so excited. I just got the Spellbinders Rose Creations dies. I've been making my own paper roses using Retro Flower punches but my size was limited to1/2 and 3/4 inch and I have been dying to buy this set.
Then the more complicated one.
Both were really quite easy though the second definitely took more time with glue.
The other video was by Carolynne1982. This one was a little like the second Donna Salazar one.
I need to glue the center of mine a little more but I am very happy with the results of all three flowers. No more buying bigger flowers for me with these new dies. Definitely check out the videos.
Friday, April 29, 2011
Wow, it has been a while. Time has gotten away from me. This is the card I made for my grandmother for her birthday. I got the original stair step card desigin from Expressions with Heart. I fell in love with her Native American Tilda stair step card. Anyway, I took Make a Wish Tilda, colored with my Copics, used Stickles for her "Fairy Dust" and have her sitting on a Jolie's border I had picked up on clearance a while ago. The papers were just from Target's dollar bins. I cut out a "Make a Wish" from one of my Cuttlebug dies and used Stickles on that too. I made the envelope box from the Split Coast Stampers tutorial here. Hope you enjoy.
Wednesday, February 2, 2011
Febuary is a Birthday month in my house, my sister and my grandmother, so I decided to make a couple cards.
This one is preaty simple. Modeled off a SplitCoastStampers' card sketch, SC303, I started with a plain, white card and embossed the front with a Happy Birthday Cuttlebug folder. Then I cut the vertical and horizontal strips, the circle and Spellbinders Beaded Oval from some fabulous hand-crafted paper that I had got at Michaels on clearence. Tilda that I colored, some pale blue pearls and a couple tissue paper flowers completed things.
Wow, it has been a while. Between the holidays and the business of the new year I hven't been able to do much crafting, other than a little coloring in the evenings. I LOVE Magnolia's Tilda stamps. I have quite a few images now and I have really improved (I feel anyways) in coloring the little things. I got hooked on Tilda stamps a few months back and tried starting with Prismacolor markers. They could be purchased locally and were cheaper than Copics and I didn't know if I really wanted to make leap since I already had alot of markers that didn't get that muck use. Well I didn't like the results I got with Prismacolors. Don't get me wrong they are great markers but not for what I wanted them for. I decided to make a small investment in Copics to start, just reds and flesh tones, a total of 6 markers. Needless to say I was addicted and I've increased my collection greatly.
To compare how my coloring technique has improved, I've found some of the original images I've done and then recolored them using teh same color scheme.
You can really see my improvement from the old ones on the left compared to the new on the right. Too bad my date is wrong... got to remember to fix the date on my camera.
To compare how my coloring technique has improved, I've found some of the original images I've done and then recolored them using teh same color scheme.
You can really see my improvement from the old ones on the left compared to the new on the right. Too bad my date is wrong... got to remember to fix the date on my camera.
Saturday, December 4, 2010
Crafting my Christmas cards and havin' fun. I don't have many that I send out but these are the ones I have finished. I got great blank shape cards at Michaels for $1.00. I love Magnolia Stamps and colored these with Copics.
This one I cut the light strand from Cricut's Wild Card, glued glitter over each bulb and then used Inkssentials Glossy Accents over the glitter. I glittered the Christmas ornament the same way. This was Michaels $1 card.
This was another $1 card, it is acutually a metallic silver. The snow flakes are confetti also from the dollar section. I used MS mica flake glitter to add snow to the tree.
I had just bought some Spellbinders Nestabilities and Impressabilities when I made this card. I like it so much that I may have to make another to keep. I embossed the card and another white sheet and then left the templet in place and went over everything with distressing ink. Cut out a navy tag and emobossed tag with the inverted scallop square. The snowman is from Magnolia stamps and has a gem in the center of his snowflake and three more gems in the corner. MS mica flakes make the snow underneath him.
This one I cut the light strand from Cricut's Wild Card, glued glitter over each bulb and then used Inkssentials Glossy Accents over the glitter. I glittered the Christmas ornament the same way. This was Michaels $1 card.
This was another $1 card, it is acutually a metallic silver. The snow flakes are confetti also from the dollar section. I used MS mica flake glitter to add snow to the tree.
I had just bought some Spellbinders Nestabilities and Impressabilities when I made this card. I like it so much that I may have to make another to keep. I embossed the card and another white sheet and then left the templet in place and went over everything with distressing ink. Cut out a navy tag and emobossed tag with the inverted scallop square. The snowman is from Magnolia stamps and has a gem in the center of his snowflake and three more gems in the corner. MS mica flakes make the snow underneath him.
This one's my sister's favorite. I cut the stamped image out with an oval and taped fan-folded mulberry paper underneath it. Hard to see but I used metalic gold marker to color in the package. So simple.
Monday, November 29, 2010
Sweet Tooth and cravings!
I have a terrible sweet tooth and my favorite poison is chocolate! Usually it doesn't matter how it's done, candy bar, mocha, ice cream but today I wanted cake. I had a cake mix but no eggs and no oil, not to mention I'd probably eat half when a cupcake would satisfy. I've Betty Crocker Warm Delights before and they do the trick but again none in my cabnets. What was I to do? I Googled that's what! I found this recipe @ TheGroceryGame.com Teri's message board.
4 Tbs Cake Mix (or brownie mix)
2 Tbs water
1.5 tsp mayo
Microwave in a bowl for ONE minute.
If you want to top with Carmel or Fudge, do it the second you pull it out of the microwave.
Hmmm... mayo? I've heard of mayo cakes before but never had one but after looking further in the posts the reasoning made sense. Mayo is made mostly of eggs and oil, two main ingrediants in cake. I tried it. WOW! I only cooked for 45sec and put 2 Hershey hugs in it. Warm, fudgie, melted white chocolate ozzing out! Everything I wanted and more. My 2 DD had one also. Their comments, "Mom, you have to make this for Santa. He's ganna LOVE IT!" Got to love it!
4 Tbs Cake Mix (or brownie mix)
2 Tbs water
1.5 tsp mayo
Microwave in a bowl for ONE minute.
If you want to top with Carmel or Fudge, do it the second you pull it out of the microwave.
Hmmm... mayo? I've heard of mayo cakes before but never had one but after looking further in the posts the reasoning made sense. Mayo is made mostly of eggs and oil, two main ingrediants in cake. I tried it. WOW! I only cooked for 45sec and put 2 Hershey hugs in it. Warm, fudgie, melted white chocolate ozzing out! Everything I wanted and more. My 2 DD had one also. Their comments, "Mom, you have to make this for Santa. He's ganna LOVE IT!" Got to love it!
Sunday, November 28, 2010
This is my entry for the Cricut Circle Blog November Monthly Challenge. It is a mirror for my oldest girl who is has a horse/western theme to her bedroom with the colors of teal and brown. My sister had given me the mirror and when the November Challenge was posted I thought redoing the mirror would be perfect
The Rules for the contest
- Use atleast one Cricut Cartridge Cut -Got it, the fence, letters and pocket were from Old West, the flowers were from Designer's Calender , the leaves from Don Juan and the swirls from Accent Essentials
- Use the Cuttlebug in some way (embossing folder, Cuttlebug die, Quilling kit, etc.)I used my Cuttlebug to emboss all the floweres with Swiss Dots and Dots and Spots before glittering
- Use Felt in some way The pocket was made with embossed felt. I cut a templet with my Cricut, cut it out by hand and embroidered it.
- Use the color GREEN somewhere on your project The leaves and Swirles, not much special there.
Close up of the pocket and floweres.
I hope every enjoys this but the most important thing is my daughter LOVES IT!
Saturday, November 27, 2010
This cute page features my baby. I just love Cricut's Create a Critter and I cut the more "BOY" appropiate bugs, sprayed each layer with corasponding Gilmmer Mist and outlined with pen stitching. All the words were cut out of white cardstock and Glimmer Misted and "stitched" as well. The grass came from the Cricut Easter cart and was flipped and welded with my Gypsy to fit across the page.
Tuesday, November 23, 2010
Time to Start and Share
I started a blog to share my work. It has been something I have considered for a while, since checking out numerous blogs from other Crafter like myself. Who am I? What do I do? I'm a mom of three and a full time RN. Alot of days I feel lucky just to brush my teeth but crafting is my way of staying sane. My crafts vary from cross stitch and crochet to painting and papercrafts. Lately it has been papercrafts and my Cricut with stamping tucked in. Sometime soon I hope to have my own craft room but for now I tucked in a corner of my living room. Here's to staying sane and Craftin' 4 Life!
Subscribe to:
Posts (Atom)